Processing live data feeds with RapidMiner

The Open File operator has been introduced in the 5.2 version of RapidMiner. It returns a file object for reading content either from a local file, from an URL or from a repository blob entry. Many data import operators including Read CSV, Read Excel and Read XML has been extended to accept a file object as input. With this new feature, now you can process live data feeds directly in RapidMiner.

Many data import operators provide a wizard to guide users through the process of parameter setting. Unfortunately, wizards can not use file objects, they always present a file chooser dialog on start. When dealing with data from the web, you can make use of the wizards according to the following scenario: download the data file and pass your local copy to the wizard. After successful import you can even delete the local file. Data import operators ignore their file name parameter when they receive a file object as input.

In the following a simple use case is presented for demonstration purposes.

The United States Geological Survey’s (USGS) Earthquake Hazards Program provides real-time earthquake data. Real-time feeds are available here. Data is updated periodically and is available for download in multiple formats. For example, click here to get data in CSV format about all M2.5+ earthquakes of the past 30 days (the feed is updated every fifteen minutes).

Let’s see how to read this feed in a RapidMiner process. First, download the feed to your computer. The local copy is required only to set the parameters of the Read CSV operator by using the Import Configuration Wizard. For this purpose you can use a smaller data file, for example this one.

Import the local copy of the feed using the wizard. Select the following data types for the attributes:

  • Src (source network): polynomial
  • EqId: polynomial
  • Version: integer
  • Datetime: date_time
  • Lat: real
  • Lon: real
  • Magintude: real
  • NST (number of reporting stations): integer
  • Region: text

Important: the value of the date format parameter must be set to E, MMM d, yyyy H:mm:ss z to ensure correct handling of the Datetime attribute. For details about date and time pattern strings consult the API documentation of the SimpleDateFormat class (see section titled Date and Time Patterns). It is also important to set the value of the locale parameter to one of the English locales.

Once the local file is imported successfully, drag the Open file operator into the process and connect its output port the input port of the Read CSV operator. Set the parameters of the Open file operator according to the following: set the value of the resource type parameter to URL, and provide the URL of the feed with the parameter url.

A RapidMiner process that uses the Open file operator to read a data feed from the web

Now you can delete the local data file, the operator will read the feed from the URL when the process is run.

You can download the complete RapidMiner process here.

Tagged ,

Free and open source XSD 1.1 validation tool?

Currently, Xerces2 Java seems to be the one and only free and open source solution for XSD 1.1 validation. You can download Xerces2 Java here. Be careful to pick the right version that comes with XSD 1.1 support. (The binary distribution is in the file Xerces-J-bin.2.11.0-xml-schema-1.1-beta.zip, and the file Xerces-J-src.2.11.0-xml-schema-1.1-beta.zip contains the sources.) This release of the package has complete support for XSD 1.1.

Unfortunately, the distribution does not provide any command line validation tool, you have to write your own from scratch. I provide a simple but handy implementation in xsd11-validator.jar. This JAR also contains Xerces2 Java with all of its dependencies.

You can run the JAR with the command java -jar xsd11-validator.jar to display usage information:

usage: java hu.unideb.inf.validator.SchemaValidator -if <file> | -iu <url>
       [-sf <file> | -su <url>]
 -if,--instanceFile <file>   read instance from the file specified
 -iu,--instanceUrl <url>     read instance from the URL specified
 -sf,--schemaFile <file>     read schema from the file specified
 -su,--schemaUrl <url>       read schema from the URL specified

You most provide an instance document to be validated using either the -if or the -iu option. (Option -if requires a file path as an argument, option -iu requires an URL.) Similarly, you can specify a schema document using either the -sf or -su option. The -sf and -su options are not mandatory, if they are omitted the value of the xsi:schemaLocation attribute is considered in the instance. The following is an example of how to use the program:

java -jar xsd11-validator.jar -sf schema.xsd -if instance.xml

From a developer’s standpoint, there is a minor flaw of Xerces2 Java: you will not find the required beta release in any of the publicly available Maven repositories. You must use your own local copy of xercesImpl.jar in your Maven projects. The good news is that its dependencies are available from repositories. Take a look at the source distribution of the command line tool to see how Xerces2 Java can be used in your Maven projects.

Tagged

Exploring the new features of XML Schema 1.1 (Part 1)

XML Schema 1.1 has just been promoted to Recommendation by the W3C in this year’s April. It’s time to explore the changes compared to the previous version.

First, the name of the standard has been changed to W3C XML Schema Definition Language (XSD). Beyond that, XSD 1.1 offers exciting new features, while preserving backward compatibility. This post is the first in a series of posts that will demonstrate some of the new features of XSD 1.1.

One of the two newly introduced constraining facets is called assertion (the other one is called explicitTimezone). As you will see, it is a powerful new feature that comes handy for defining datatypes. The facet constrains the value space by a user-provided logical expression that must be satisfied.

The following simple example demonstrates how to use the assertion facet:

<?xml version="1.0"?>
<xs:schema xmlns:xs="http://www.w3.org/2001/XMLSchema">

    <xs:element name="number">
        <xs:simpleType>
            <xs:restriction base="xs:integer">
                <xs:assertion test="abs($value mod 2) eq 1"/>
            </xs:restriction>
        </xs:simpleType>
    </xs:element>

</xs:schema>

Note that the above just looks like as a plain old schema document, except for the assertion element. There is no way to explicitly indicate that XSD 1.1 is being used here.

The test attribute of the assertion element contains an XPath 2.0 expression that will be evaluated as true or false. (The boolean function is used to convert the value of the expression to a boolean.) In the XPath expression $value can be used to refer to the value being checked.

As mod stands for the modulo operation, the value space of the datatype defined is clearly the set of odd integers. Note that, an equivalent solution is to use regular expression matching that is also available in XML Schema 1.0. Replacing the assertion element in line 7 with

    <xs:pattern value=".*[13579]"/>

also results in the same value space.

However, there are situations in which regular expressions can not help. For example, consider the case of palindromes. Let’s try to define a new datatype whose value space is the set of palindrome strings. You may recall that from your computational theory class, this is not possible by using regular expressions. The good news is that we can do it by using XPath functions.

Since there is an XPath function called reverse,

<xs:simpleType name="palindromeString">
    <xs:restriction base="xs:string">
        <xs:assertion test="$value eq reverse($value)/">
    </xs:restriction>
</xs:simpleType>

seems to be a reasonable initial solution. Unfortunately, the function operates on sequences and can not be used to reverse strings directly.

The following trick will do the job. First, we will turn the string being checked into a sequence of Unicode codepoints (ie. a sequence of integers) using the string-to-codepoints function. Then the reverse function is applied to the resulting sequence. Finally, the codepoints-to-string function is used to turn it back into a string. Thus, our solution is now the following:

<xs:simpleType name="palindromeString">
    <xs:restriction base="xs:string">
        <xs:assertion test="$value eq codepoints-to-string(reverse(string-to-codepoints($value)))"/>
    </xs:restriction>
</xs:simpleType>

One more step is necessary to complete our job: comparison must be performed ignoring case and any punctuation characters. In order to do that we must replace both occurrences of $value with lower-case(replace($value, '[\s\p{P}]', '')) in the test attribute. Here we use the replace function to remove any whitespace and punctuation characters from the string.

Our final solution is the following:

?xml version="1.0"?>
<xs:schema xmlns:xs="http://www.w3.org/2001/XMLSchema">

    <xs:simpleType name="palindromeString">
        <xs:restriction base="xs:string">
            <xs:assertion test="lower-case(replace($value, '[\s\p{P}]', '')) eq codepoints-to-string(reverse(string-to-codepoints(lower-case(replace($value, '[\s\p{P}]', '')))))"/>
        </xs:restriction>
    </xs:simpleType>

    <xs:element name="palindrome" type="palindromeString"/>

</xs:schema>

For example, the following are all valid instances of the palindrome element:

<palindrome>never odd or even</palindrome>
<palindrome>Madam, I'm Adam</palindrome>
<palindrome>
    A man, a plan, a canal - Panama!
</palindrome>

You can download the examples above in a ZIP archive here.

Tagged

Breaking the silence: a note about the Apriori algorithm

It’s been a long time since my last post, here I am back again.

Introduction to Data Mining by Pang-Ning Tan, Michael Steinbach and Vipin Kumar [1] is a good introductory textbook in Data Mining. The book has been translated into Hungarian and will hopefully be published in my country this year. Actually, I am one of the translators of the Hungarian edition.

Apriori is a classic algorithm for mining association rules. Chapter 6 of the book discusses the Apriori algorithm. Unfortunately, I found that the pseudocodes for the rule generation step (see Algorithm 6.2 and 6.3 on pages 351 and 352) do not work as expected. These two pseudocodes are the following:

Here \sigma(X) denotes the support count of the itemset X and the function apriori-gen generates the set of frequent (k + 1)-itemsets from the set of frequent k-itemsets.

The main problem is that Algorithm 6.2 and 6.3 above will never generate rules with 1-item consequents. In the original paper that introduces the Apriori algorithm [2] the set H_1 on line 2 of Algorithm 6.2 is defined as the set of consequents of rules derived from f_k with one item in the consequent. However, this implicitly assumes that rules with 1-item consequents are already available. [2] also states that a separate algorithm is required to generate these rules (see page 14):

The rules having one-item consequents in step 2 of this algorithm can be found by using a modified version of the preceding genrules function in which steps 8 and 9 are deleted to avoid the recursive call.

It should also be noted that line 2 of Algorithm 6.2 is simply equivalent to H_1 = f_k.

Finally, the formula on line 2 of Algorithm 6.3 is misleading, since vertical bars are traditionally used to denote cardinality. (In our case m is not the cardinality of set H_m.) I think that the first two lines of Algorithm 6.3 are unnecessary and can be omitted.

Since the book is widely used as a textbook the above problems should be corrected. I have reported the problems to the authors, I hope that they will update the errata of the book accordingly.

Algorithm 6.2 and 6.3 can be modified as follows:

These modified algorithms work as expected and will generate all rules including the ones with 1-item consequents.

References

  1. Pang-Ning Tan, Michael Steinbach and Vipin Kumar. Introduction to Data Mining. Addison-Wesley, 2005.
  2. Rakesh Agrawal and Ramakrishnan Srikant. Fast Algorithms for Mining Association Rules. Proceedings of the 20th International Conference on Very Large Data Bases, Santiago, Chile, September 1994.
Tagged

Logback is wonderful (Part 2)

My second post about Logback presents a truly wonderful feature: it can reconfigure itself automatically when the configuration file changes. This means that your application do not have to be restarted when you modify logback.xml.

The following configuration file demonstrates how to use this feature:

<configuration debug="true" scan="true" scanPeriod="5 seconds">

    <appender name="STDOUT" class="ch.qos.logback.core.ConsoleAppender">
        <filter class="ch.qos.logback.classic.filter.ThresholdFilter">
            <level>ALL</level>
        </filter>
        <encoder>
            <pattern>%d{HH:mm:ss.SSS} [%thread] %-5level %logger{36} - %msg%n</pattern>
        </encoder>
    </appender>

    <root level="ALL">
        <appender-ref ref="STDOUT" />
    </root>

</configuration>

If the value of the scan attribute on the configuration element is true, Logback will scan for changes in the configuration file periodically.

The value of the scanPeriod attribute on the configuration element determines how often Logback will look for changes in the configuration. Values can be specified in units of milliseconds, seconds, minutes or hours. For example, the following are all valid values for the scanPeriod attribute: 1500 milliseconds, 1 second, 0.5 minute, 2 hours, 1 day.

Each time the configuration file changes the logging system will automatically re-configure itself accordingly.

To play with this handy feature download this project. (Building the project requires Apache Maven.) Run the my.Main class that will bring up a window in which the logback.xml file can be edited. The program writes log messages to the console in an infinite loop using a timer.

Modify and save the configuration to see the effects immediately. For example, change the content of the level element to OFF in line 5 to completely disable logging on the console. To log messages at or above the WARN level use the value WARN instead.

Toy example that demonstrates automatic re-configuration


Logback is wonderful, isn’t it?

Tagged

Logback is wonderful (Part 1)

Logback is a wonderful logging framework written in Java and distributed under the GNU Lesser General Public License v2.1 and the Eclipse Public License v1.0.

Its functionality can be accessed via the SLF4J API that Logback implements natively. The following toy example demonstrates how to use Logback:

package my;

import org.slf4j.Logger;
import org.slf4j.LoggerFactory;

public class Main {

    private static Logger logger = LoggerFactory.getLogger(Main.class);

    public static void main(String[] args) {
        logger.error("This is an ERROR message");
        logger.warn("This is a WARNING message");
        logger.info("This is an INFO message");
        logger.debug("This is a DEBUG message");
        logger.trace("This is a TRACE message");
        logger.info("User's name is {}", System.getProperty("user.name"));
    }

}

In order to compile and execute the program logback-core-1.0.3.jar and logback-classic-1.0.3.jar must be in the classpath. (They can be found in the distribution archive.) The JARs are also available from the Maven Central Repository. Simply add the following dependencies to your Apache Maven project that uses Logback:

<dependency>
    <groupId>ch.qos.logback</groupId>
    <artifactId>logback-core</artifactId>
    <version>1.0.3</version>
</dependency>
<dependency>
    <groupId>ch.qos.logback</groupId>
    <artifactId>logback-classic</artifactId>
    <version>1.0.3</version>
</dependency>

Logging can be configured via an XML configuration file named logback.xml. To play with the example program use this logback.xml:

<configuration>

    <appender name="STDOUT" class="ch.qos.logback.core.ConsoleAppender">
        <filter class="ch.qos.logback.classic.filter.ThresholdFilter">
            <level>ALL</level>
        </filter>
        <encoder>
            <pattern>%d{HH:mm:ss.SSS} [%thread] %-5level %logger{36} - %msg%n</pattern>
        </encoder>
    </appender>

    <root level="ALL">
        <appender-ref ref="STDOUT" />
    </root>

</configuration>

Logback will look for it automatically in the classpath.

Logback has great features. It provides a number of appenders to publish log messages. For example, it can deliver log messages in email. You can also write your own appender. Moreover, logging can be fully configured from the XML configuration file.

The next installments of this blog post series will introduce some of its most exciting features.

You can download the above example from here (a more advanced configuration file is included). Building the project requires Apache Maven.

Tagged

Source code syntax highlighting in LaTeX using Pygments

A number of LaTeX packages provide environments for displaying source code, a comprehensive list of them is available here. For a long time I have preferred to use the fancyvrb package to format computer source code. I have just found an excellent alternative, called minted (it is also available at CTAN).

Minted uses Pygments, a general purpose syntax highlighter written in the Python programming language. Python and Pigments have to be installed in order to use minted, and a few other LaTeX packages are also required. (See the documentation for detailed installation instructions.)

The following simple example shows how to use minted:

\documentclass{article}
\usepackage{minted}

\begin{document}

\begin{minted}[frame=single,linenos,mathescape]{java}
public class Fibonacci {

  // The golden ratio $\phi = \frac{1 + \sqrt{5}}{2}$.
  public static final double PHI = (1.0 + Math.sqrt(5.0)) / 2.0;

  public static double fibonacci(long n) {
    if (n < 0) throw new IllegalArgumentException();
    return Math.floor(Math.pow(PHI, n) / Math.sqrt(5.0) + 0.5);
  }

}
\end{minted}

\end{document}

Click here to see the result.

The language java in line 6 can be replaced with many other languages, such as c, c++, sql, tex or xml. Pygments currently supports more than 200 programming, template and markup languages, see the output of the command

pygmentize -L lexers

for an exhaustive list of them. It is very important that LaTeX source files using the minted package must be compiled with the -shell-escape option, such as

pdflatex -shell-escape file.tex

Minted provides a number of options to customize formatting. For convenience, you can choose any of the styles provided with Pygments (you can also write your own style).

A major limitation of the package is that it supports only the Latin-1 character encoding. To overcome this problem the documentation suggests to use the command xelatex instead of the command pdflatex. (xelatex is part of XeTeX, an extension of TeX that comes with built-in support for Unicode.) Unfortunately, this solution does not work for me. If I try to compile the above LaTeX file with xelatex I always get the following error:

! Undefined control sequence.
l.27 \ifnum\pdf@shellescape
                           =1\relax

Thanks to Jabba Laci the great pythonist for introducing me to minted.

Tagged ,

Readline style command line editing with JLine

JLine 2.x is a free and open source console I/O library written in Java and distributed under the Modified BSD License

It offers line-editing and history capabilities for console applications, that are similar to the functions provided by the GNU readline library. For a complete list of its main features see the wiki page of the project.

Since JLine is available from the Maven Central Repository, the easiest way to get it is to add the following dependency to your project’s POM:

<dependency>
    <groupId>jline</groupId>
    <artifactId>jline</artifactId>
    <version>2.6</version>
    <scope>compile</scope>
</dependency>

The following is a simple example that demonstrates how to use the library:

import java.io.IOException;

import jline.TerminalFactory;
import jline.console.ConsoleReader;

public class ConsoleDemo {

    public static void main(String[] args) {
        try {
            ConsoleReader console = new ConsoleReader();
            console.setPrompt("prompt> ");
            String line = null;
            while ((line = console.readLine()) != null) {
                console.println(line);
            }
        } catch(IOException e) {
            e.printStackTrace();
        } finally {
            try {
                TerminalFactory.get().restore();
            } catch(Exception e) {
                e.printStackTrace();
            }
        }
    }

}

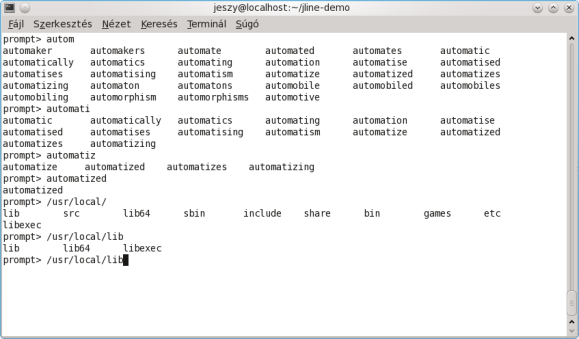
The program uses the ConsoleReader class to read lines from the console until end-of-file is encountered (press control-D to signal end-of-file). The lines read are simply echoed back to the console. Command line history is enabled by default, you can recall and edit lines that have been previously entered.

JLine supports command line completion that is bound to the TAB key by default. For example, to enable automatic file name completion simply add a FileNameCompleter instance to the console object with the following line of code:

console.addCompleter(new FileNameCompleter());

You can add more completers, such as a StringsCompleter with a collection of strings:

console.addCompleter(
    new StringsCompleter(
        IOUtils.readLines(new GZIPInputStream(ConsoleDemo.class.getResourceAsStream("wordlist.txt.gz")))
    )
);

Here we use a compressed wordlist from the file wordlist.txt.gz that is loaded by the IOUtils class from the Commons IO library.

Command line editing with JLine

Command line editing with JLine

The TerminalFactory.get().restore() call in the finally block does some cleanup and restores the original terminal configuration. This cleanup is performed automatically, if the jline.shutdownhook system property is set to true.

It’s a bit odd that the API documentation is not available online, however, you can grab the javadoc in a JAR from Maven Central. It should also be noted that the API documentation could be better. (Some of the methods are completely undocumented.) Despite these minor shortcomings, it is an excellent library that deserves attention.

You can download the above example program from here.

Tagged

Cross-validation in RapidMiner

Cross-validation is a standard statistical method to estimate the generalization error of a predictive model. In k-fold cross-validation a training set is divided into k equal-sized subsets. Then the following procedure is repeated for each subset: a model is built using the other (k - 1) subsets as the training set and its performance is evaluated on the current subset. This means that each subset is used for testing exactly once. The result of the cross-validation is the average of the performances obtained from the k rounds.

This post explains how to interpret cross-validation results in RapidMiner. For demonstration purposes, we consider the following simple RapidMiner process that is available here:

The Read URL operator reads the yellow-small+adult-stretch.data file, a subset of the Balloons Data Set available from the UCI Machine Learning Repository. Since this data set contains only 16 examples, it is very easy to perform all calculations in your head.

The Set Role operator marks the last attribute as the one that provides the class labels. The number of validations is set to 3 on the X-Validation operator, that will result a 5-5-6 partitioning of the examples in our case.

In the training subprocess of the cross-validation process a decision tree classifier is built on the current training set. In the testing subprocess the accuracy of the decision tree is computed on the test set.

The result of the process is the following PerformanceVector:

74.44 is obviously the arithmetic mean of the accuracies obtained from the three rounds and 10.30 is their standard deviation. However, it is not clear how to interpret the confusion matrix below and the value labelled with the word makro. You may ask how a single confusion matrix is returned if several models are built and evaluated in the cross-validation process.

The Write as Text operator in the inner testing subprocess writes the performance vectors to a text file that helps us to understand the results above. The file contains the confusion matrices obtained from each round together with the corresponding accuracy values as shown below:

13.04.2012 22:07:35 Results of ResultWriter 'Write as Text' [1]: 
13.04.2012 22:07:35 PerformanceVector:
accuracy: 60.00%
ConfusionMatrix:
True:	T	F
T:	0	0
F:	2	3

13.04.2012 22:07:35 Results of ResultWriter 'Write as Text' [2]: 
13.04.2012 22:07:35 PerformanceVector:
accuracy: 83.33%
ConfusionMatrix:
True:	T	F
T:	2	0
F:	1	3

13.04.2012 22:07:35 Results of ResultWriter 'Write as Text' [3]: 
13.04.2012 22:07:35 PerformanceVector:
accuracy: 80.00%
ConfusionMatrix:
True:	T	F
T:	2	1
F:	0	2

Notice that the confusion matrix on the PerformanceVector (Performance) tab is simply the sum the three confusion matrices. The value labelled with the word mikro (75) is actually the accuracy computed from this aggregated confusion matrix. A performance calculated this way is called mikro average, while the mean of the averages is called makro average. Note that the confusion matrix behind the mikro average is constructed by evaluating different models on different test sets.

Tagged ,

Using Web Services in RapidMiner

The Enrich Data by Webservice operator of the RapidMiner Web Mining Extension allows you to interact with web services in your RapidMiner process.

A web service can be invoked for each example of an example set. (Note that this may be time-consuming.) All strings of the form <%attribute%> in a request will be automatically replaced with the corresponding attribute value of the current example. The operator provides several different methods to parse the response, including the use of regular expressions and XPath location paths. Parsing the result you can add new attributes to your example set.

For demonstration purposes we will use the Google Geocoding API. This web service also offers reverse geocoding functionality, i.e. provides a human-readable address for a geographical location. To see how it works, click on the following link: http://maps.googleapis.com/maps/api/geocode/xml?latlng=47.555214,21.621423&sensor=false. Notice that latitude and longitude values are passed to the service in the latlng query string parameter.

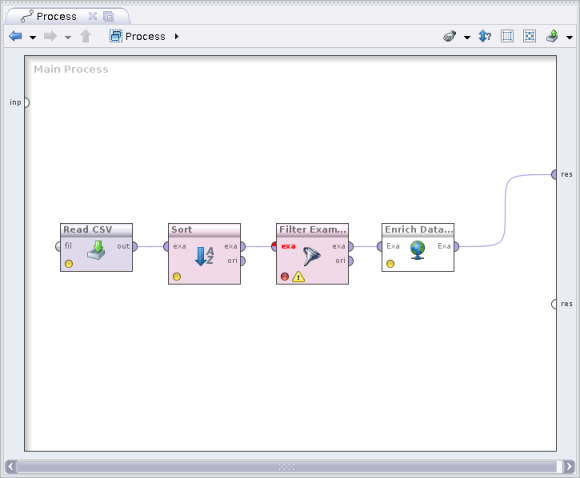
We will use this data file for our experiment. The file contains earthquake data that originates from the Earthquake Search service provided by the United States Geological Survey (USGS). Consider the following RapidMiner process that is available from here:

A RapidMiner process that uses the Enrich Data by Webservice operator to interact with a web service

A RapidMiner process that uses the Enrich Data by Webservice operator to interact with a web service

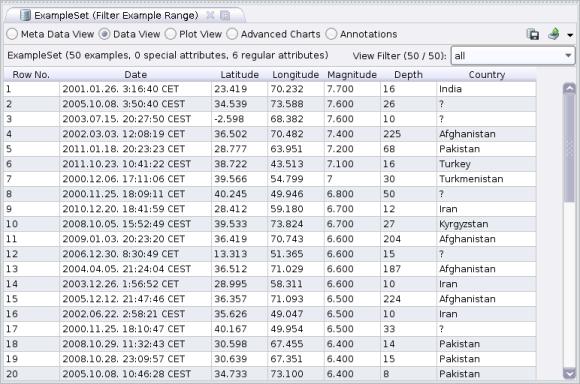
First, the data file is read by the Read CSV operator. Then the Sort and Filter Example Range operators are used to filter the 50 highest magnitude earthquakes. Finally, the Enrich Data by Webservice operator invokes the web service to retrieve country names for the geographical locations of these 50 earthquakes. (Only a small subset of the entire data is used to prevent excessive network traffic.)

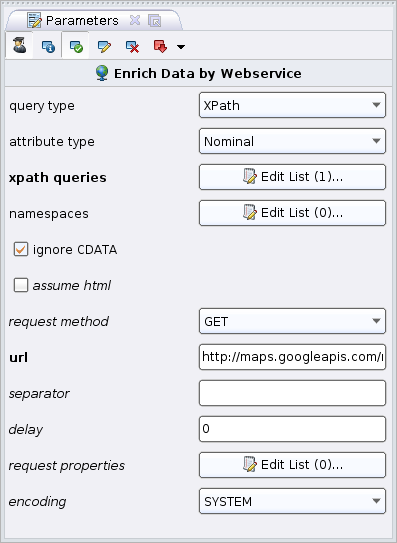
The parameters of the Enrich Data by Webservice operator should be set as follows (see the figure below):

  • Set the value of the query type parameter to XPath
  • Set the value of the attribute type parameter to Nominal
  • Uncheck the checkbox of the assume html parameter
  • Set the value of the request method parameter to GET
  • Set the value of the url parameter to http://maps.googleapis.com/maps/api/geocode/xml?latlng=<%Latitude%>,<%Longitude%>&sensor=false
Parameters of the Enrich Data by Webservice operator

Parameters of the Enrich Data by Webservice operator

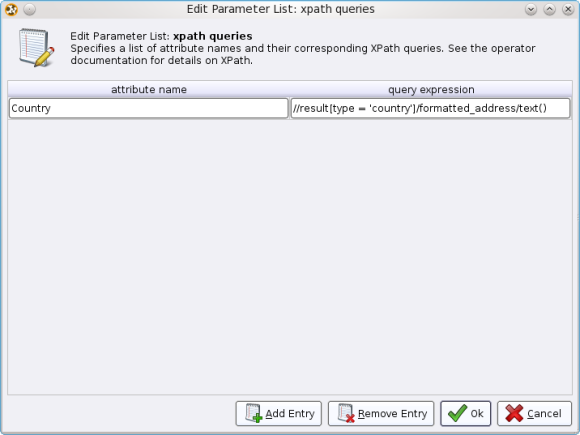
Finally, click on the Edit List button next to the xpath queries parameter that will bring up an Edit Parameter List window. Enter the string Country into the attribute name field and the string //result[type = 'country']/formatted_address/text() into the query expression field.

Setting of the xpath queries parameter

Setting of the xpath queries parameter

That’s all! Unfortunately, running the process results in the following error:

Process Failed

Process Failed


Well, this is a bug that I have already reported to the developers. (See the bug report here.) The following trick solves the problem: set the request method parameter of the Enrich Data by Webservice operator to POST, enter some arbitrary text into the parameter service method, then set the request method parameter to GET again.

The figure below shows the enhanced example set that contains country names provided by the web service (see the Country attribute).

Enhanced example set with country names

Enhanced example set with country names

Tagged , ,